Article
MCP with Spring AI
Integrate MCP clients or servers in your Spring Boot applications with Spring AI.


Table of contents
- Introduction
- What is MCP?
- MCP architecture
- Implement an MCP server
- Call it with MCP inspector
- Call it from Copilot in your IDE
- Implement an MCP client
- Conclusion
Introduction
MCP is a very powerful standard protocol for integrating LLMs with external services. In this third Spring AI article, I will show how to use it in Spring Boot applications. I will explain how to implement a simple MCP server. I will show how to call it from MCP Inspector or from the Copilot plugin for IntelliJ. I will also describe how to develop an MCP client application that calls that MCP server.
MCP client and server sample applications illustrating this article are available in GitHub,
see spring-ai-mcp-client and spring-ai-mcp-server folders of
spring-ai-samples.
The articles in this series:
- Getting started with Spring AI: Ollama and OpenRouter setup, prompting, templates, temperature, structured output, token usage, etc.
- Chatbot with Spring AI: chatbot, conversations, function calling.
- MCP with Spring AI (this article): MCP client, MCP server, MCP Inspector, Copilot.
Please refer to the first article to get started properly.
What is MCP?
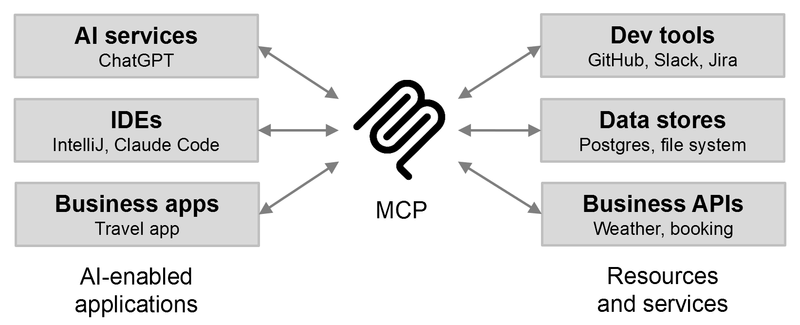
MCP stands for Model Calling Protocol. It is a standard protocol used by LLMs from AI-enabled applications (your business applications, IntelliJ, Claude Code, etc.) to interact with external resources and services.
For example, it can make the LLM of your travel application interact with third-party weather or booking services.
Or it can make the LLM used by your IDE interact with database servers to answer questions about the tables, with github.com to create branches or with Jira to close tickets, when asked to do so.
In an AI-enabled travel application, we can use function calling to execute a local method providing weather information. See the function calling example from the previous article for additional information.
Chances are that this method is implemented by calling an external weather REST API. This means that we have to learn that REST API then write and maintain some code. Not a big deal but this can be simplified with MCP.
Instead, if we find a weather service provider that supports MCP, we can simply declare that MCP server in the application to make it available to the LLM. No need to write some code. Of course, there are security considerations. For example, some credentials may be required to access that MCP server. But this is out of the scope of this article.
The benefits for an MCP host are to easily discover and use external services without having to learn their API or write code to call them.
The benefits for an MCP server are to easily integrate with many AI-enabled applications.
MCP architecture
MCP follows a client-server architecture. From the previous example, in MCP terminology, the business application is an MCP host. It uses an LLM and embeds an MCP client that acts as a bridge to the MCP server providing the weather service.
But in practice, MCP hosts are often called MCP client applications or simply MCP clients.
IntelliJ, VSCode, Claude Code and alike are other examples of MCP hosts.
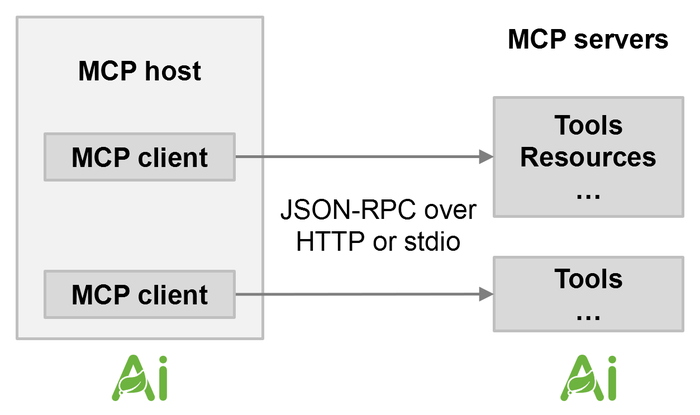
Spring AI supports both MCP clients and MCP servers. This means that you can use Spring AI in your applications to call external MCP servers, and you can also use Spring AI to turn your application to an MCP server.
A given MCP host can be configured to use multiple MCP servers.
MCP supports several features such as tools, resources, prompts, etc. In this article I will focus on tools only. They are similar to the tools used in function calling, but they do not have to be embedded in the application.
MCP uses JSON-RPC data format over HTTP or standard I/O communications.
Implement an MCP server
Let's write a simple MCP server using Spring Boot and Spring AI. Our server will expose a single tool providing weather information for a given city. It is similar to the function calling example from the previous article, but this time we use MCP.
In your pom.xml, first declare the Spring AI bill of materials (BOM):
<dependencyManagement>
   ...
    <dependencies>
        <dependency>
            <groupId>org.springframework.ai</groupId>
            <artifactId>spring-ai-bom</artifactId>
            <version>YOUR_SPRING_AI_VERSION</version>
            <type>pom</type>
            <scope>import</scope>
        </dependency>
    </dependencies>
</dependencyManagement>
Then add the MCP server starter:
<dependency>
    <groupId>org.springframework.ai</groupId>
    <artifactId>spring-ai-starter-mcp-server-webmvc</artifactId>
</dependency>
No need to explicitly add the Spring Web starter. We do not declare any LLM dependency because the MCP server itself doesn't use any LLM.
We also add a bit of MCP configuration in the application.properties:
spring.ai.mcp.server.name=weather-server
spring.ai.mcp.server.protocol=STREAMABLE
This basic configuration is enough to get started, but there are many additional parameters.
For example, to change the default /mcp MCP path, use spring.ai.mcp.server.streamable-http.mcp-endpoint.
Note that I chose the STREAMABLE protocol, instead of the default SSE, to match the latest MCP recommendations.
Then we add the tool in a business service using the right annotations:
@Service
public class WeatherService {

    @McpTool(description = "Return the current weather report for a given city including the condition and temperature in celsius.")
    public WeatherReport getCurrentWeather(@McpToolParam(description = "The name of the city") String city) {
        ...
    }
}
Once again, this is similar to the function calling example from the previous article.
@McpTool declares a tool and @McpToolParam declares a parameter of a tool.
See linked repository for the full sources.
The descriptions are used by the LLM from the MCP host to decide when to use a given tool and how to call it.
When we start the application, the MCP server is available at http://localhost:8080/mcp.
In the startup logs, we can see that our tool was detected:
INFO o.s.a.m.s.c.a.McpServerAutoConfiguration : Registered tools: 1Call it with MCP inspector
To make sure that the server is in order, we can use the MCP Inspector. This utility can inspect and test MCP servers.
It is a Node.js application, execute npx @modelcontextprotocol/inspector to open its web interface.
To call our weather tool:
- Select the
Streamable HTTPtransport type. - Use the
http://localhost:8080/mcpURL. - Click on
Connect, then on theToolstab, then on theList Toolsbutton and select the tool. - Input a city name and click on the
Run Toolbutton to get the response under theTool Resultsection.
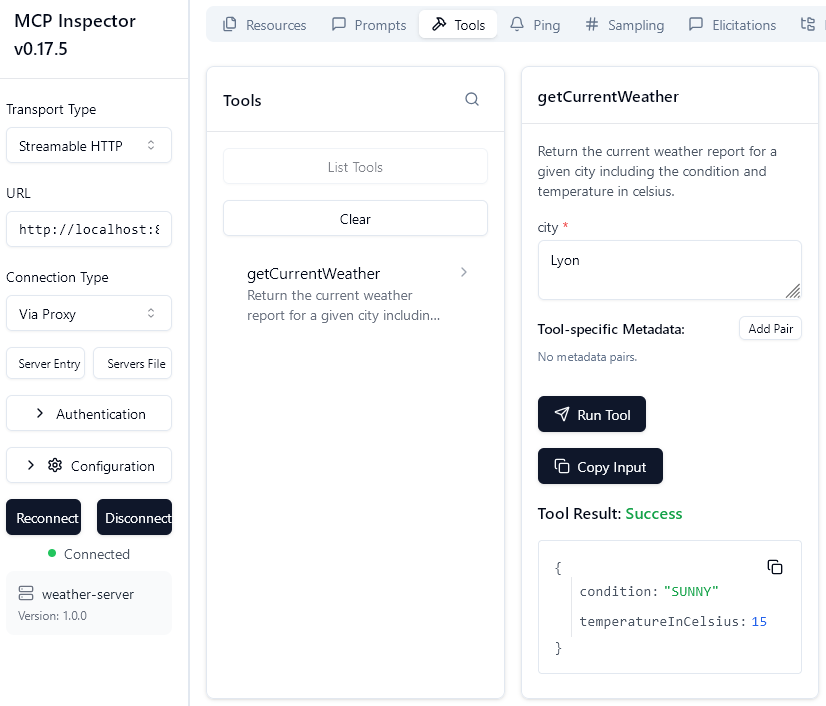
In our server logs we can see the execution of the tool:
INFO c.a.sample.service.WeatherService : Weather report for 'Lyon': WeatherReport[condition=SUNNY, temperatureInCelsius=15.0]MCP Inspector can do a lot more, but this is enough to quickly test our MCP server.
Call it from Copilot in your IDE
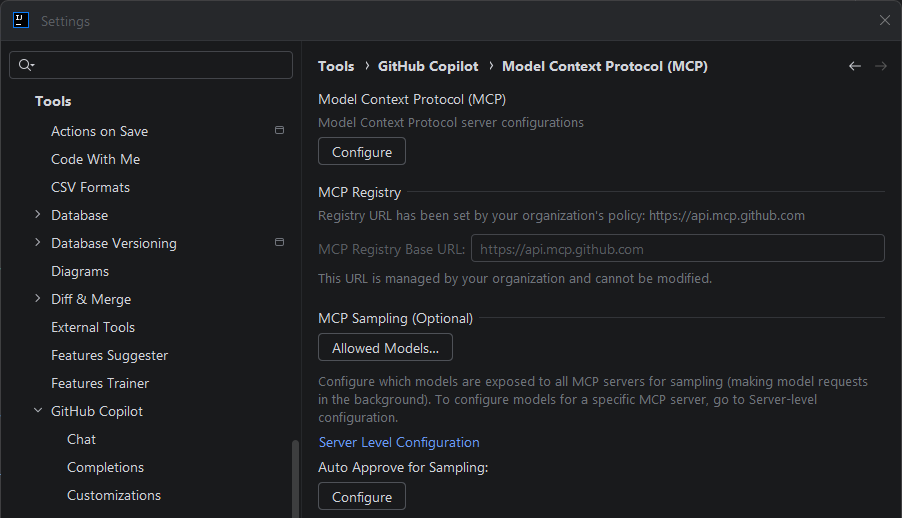
We can also call our MCP server using an AI coding assistant from our IDE, such as Copilot in IntelliJ.
We first declare the MCP server in the Copilot mcp.json configuration file.
You can open it from the IntelliJ settings, click on the top Configure button in the MCP section of Copilot:
Alternatively, you can open it through the Copilot chat window: select the Agent mode, click on the tools icon,
then click on Add mode tools.
Add the MCP server definition in that file:
{
  "servers": {
    ...
    "demo-weather-server": {
      "type": "http",
      "url": "http://localhost:8080/mcp"
    }
  }
}
The name does not have to match. Then you may have to start the connection to the MCP server:

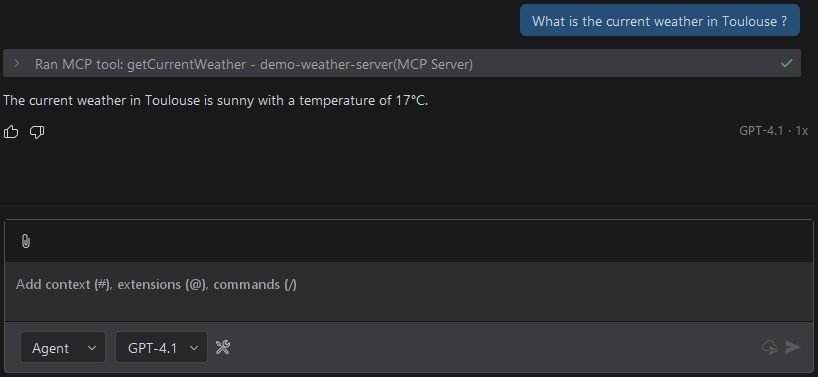
Then in the Copilot chat, ask about the weather for a given city:
Implement an MCP client
Now let's implement an MCP client application using Spring AI that calls our MCP server when asked about weather information.
We declare the same BOM, then add your chosen LLM provider starter (I used Ollama here) and the MCP client starter:
<dependency>
    <groupId>org.springframework.ai</groupId>
    <artifactId>spring-ai-starter-model-ollama</artifactId>
</dependency>
<dependency>
    <groupId>org.springframework.ai</groupId>
    <artifactId>spring-ai-starter-mcp-client</artifactId>
</dependency>
We add a bit of MCP client configuration in the application.properties. Once again, the name does not have to match:
spring.ai.ollama.chat.options.model=llama3.1:8b
spring.ai.mcp.client.streamable-http.connections.my-weather-server.url=http://localhost:8080
Then we can define the ChatClient instance:
@Bean
ChatClient chatClient(ChatClient.Builder builder, ToolCallbackProvider toolCallbackProvider) {
    return builder
        .defaultToolCallbacks(toolCallbackProvider)
        ... // other configuration as needed
        .build();
}
The client side magic is performed by ToolCallbackProvider.
It is created and injected by Spring, and wraps the MCP server we declared.
We pass it to the ChatClient.Builder to make our MCP server available to the LLM used by the ChatClient.
Finally, we can inject and use the ChatClient, as we saw in the first article, to get weather information:
String result = chatClient.prompt("What is the current weather in Paris ?").call().content();The response is something like:
The current weather in Paris is stormy with a temperature of 14 degrees Celsius.Conclusion
In this article, we saw how to implement both sides of MCP with Spring AI. A simple MCP server providing weather information and a simple MCP client application calling that MCP server. We also saw how to call that MCP server from the MCP Inspector or from Copilot in IntelliJ.
This is just a quick introduction to MCP. I hope it will encourage you to have a look at additional features such as resources and prompts.