Article
MCP Apps with Spring AI
Build rich and interactive MCP Apps with Spring AI.



Table of contents
Introduction
Although they usually support advanced text display (titles, lists, tables, etc.), many AI assistants are essentially text oriented.
But in many cases, it is preferable to use a rich and interactive UI to display information and perform actions: searching products, planning a trip, selecting flights, using forms and dashboards, etc.
MCP Apps is an extension to MCP, and is a standardized way to add rich interactive UIs to LLM-powered applications. In addition to the usual tools that return text or data, an MCP server can provide interactive HTML and JavaScript UIs displayed in the MCP client.
In this article, I will show how to implement MCP Apps with Spring AI in a Spring Boot backend. I will also show how to run these MCP Apps with two MCP clients.
A sample application illustrating this article is available on GitHub,
see spring-ai-mcp-server folder of ai-samples repository.
This article is part of a Spring AI series:
- Getting started with Spring AI: Ollama and OpenRouter setup, prompting, templates, temperature, structured output, token usage, etc.
- Chatbot with Spring AI: chatbot, conversations, function calling.
- MCP with Spring AI: MCP client, MCP server, MCP Inspector, Copilot.
- MCP Apps with Spring AI (this article): MCP Apps, MCP Inspector, Goose.
This article does not cover the basics of MCP. Please refer to the previous article to get started with MCP.
What are MCP Apps?
Put simply, MCP Apps are interactive HTML components served by an MCP server and displayed in an MCP client (such as MCP Inspector, Goose, Claude desktop, Copilot app, chatgpt.com, etc.).
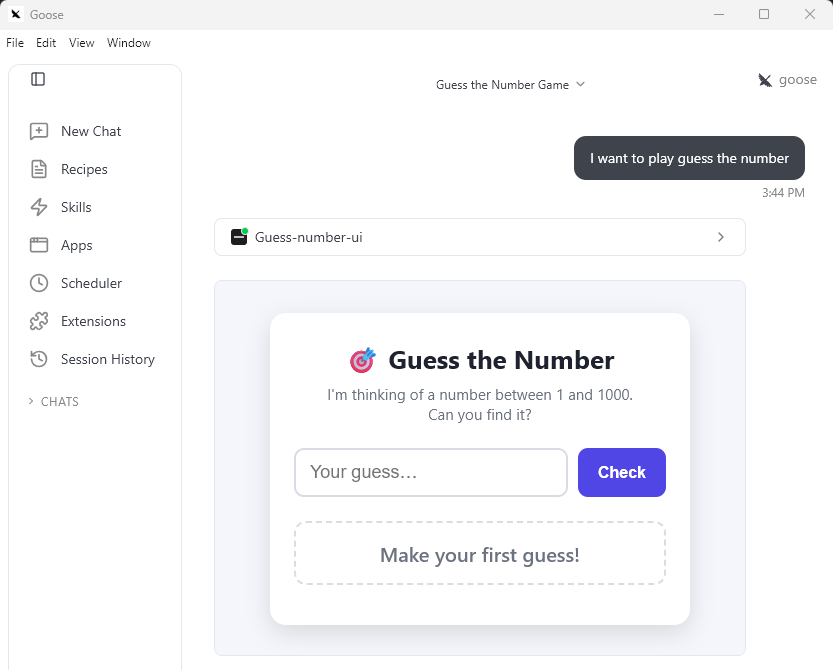
For example, when asked I want to play guess the number an MCP server could return this MCP App:
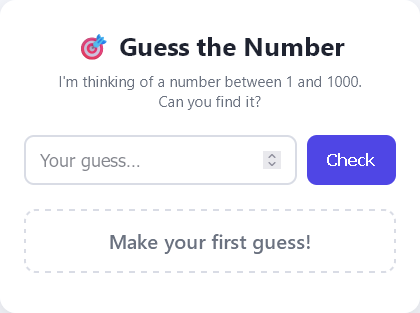
This is the MCP App provided by my sample repository. In this article I will describe it.
The user guesses a number between 1 and 1000, and the MCP App UI provides feedback on the guess.
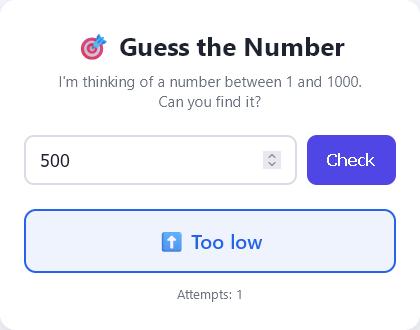
It will also display a congratulations message when the user finds the correct number.
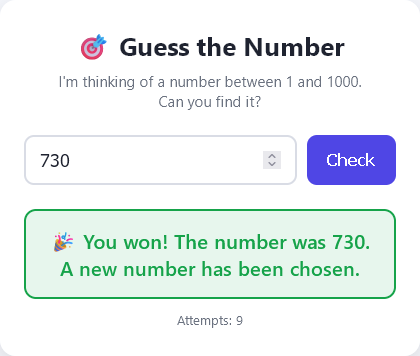
Technically, MCP Apps is an extension to MCP that lets an MCP server associate a tool with an interactive HTML/JavaScript UI. The simplified launch sequence of the Guess the Number MCP App is:
- The MCP server declares a tool with the description
Use this tool when the user wants to play guess the numberand a metadata that points to the corresponding MCP resource (the HTML/JavaScript UI). - In a conversation in the MCP client, the user asks
I want to play guess the number. - The LLM matches the user request to the tool, and triggers the call to the tool by the MCP client.
- The MCP client retrieves the corresponding MCP resource and displays the associated UI.
- The user interacts with the MCP App UI.
MCP Apps are interactive, meaning that an MCP App UI can:
- Call tools from the MCP server to perform some action and update the UI. For example, a click on
Checkor a keypress onEntercalls thecheck-guessMCP tool with the current guess to check if it is correct and display some feedback such asToo high,Too loworYou won. - Pass information to the LLM conversation, e.g.
The user guessed number 730 in 9 attempts.
For security reasons, an MCP App is executed inside a sandbox in the MCP client with restricted permissions.
Implement an MCP App
Spring AI supports MCP Apps. Adding a basic MCP App to an existing MCP server based on Spring AI is quite easy.
This article focuses on the MCP Apps specifics. To get started with MCP basics with Spring AI, please refer to the previous MCP with Spring AI article.
Adding an MCP App to a Spring AI powered MCP server is a four-steps process:
- Declare the MCP resource that serves the MCP App UI.
- Implement the MCP tool that points to the resource.
- (Optional) Implement the MCP tools that will be called by the MCP App UI in response to user actions.
- Write the HTML/JavaScript content of the resource.
The first step is to declare the MCP resource that serves the MCP App UI. This can be done in a Spring component:
@Service
public class GuessNumberMcpApp {

    ...

    // Step 1 - The resource that serves the MCP App UI

    @Value("classpath:/app/guess-number-app.html")
    private Resource guessNumberAppResource;

    @McpResource(name = "Guess Number App Resource", uri = "ui://guess-number/guess-number-app.html",
            mimeType = "text/html;profile=mcp-app", metaProvider = CspMetaProvider.class)
    public String getGuessNumberAppResource() throws IOException {
        return guessNumberAppResource.getContentAsString(StandardCharsets.UTF_8);
    }

    public static final class CspMetaProvider implements MetaProvider {
        @Override
        public Map<String, Object> getMeta() {
            return Map.of("ui", Map.of("csp", Map.of("resourceDomains", List.of("https://unpkg.com"))));
        }
    }

    ...
}
The @Value-injected resource is used to load the HTML UI content. I will describe its structure later.
The @McpResource annotation declares the MCP App resource with various attributes including the URI.
The CSP (Content Security Policy) part is used to allow the MCP App, when executed by the MCP client,
to load resources from the unpkg.com domain. This is needed for the MCP App JavaScript library.
The second step is to implement the MCP tool that points to the resource. This can be done in the same Spring component:
@Service
public class GuessNumberMcpApp {

    ...

    // Step 2 - The tool that points to the UI resource

    @McpTool(title = "Open Guess the Number UI", name = "guess-number-ui",
            description = """
                    Display the interactive 'Guess the Number' game UI where the user must find a number.
                    Use this tool when the user wants to play guess the number.
                    """,
            metaProvider = GuessNumberMetaProvider.class)
    public String openGuessNumberApp() {
        return "Guess the Number game loaded.";
    }

    public static final class GuessNumberMetaProvider implements MetaProvider {
        @Override
        public Map<String, Object> getMeta() {
            return Map.of("ui", Map.of("resourceUri", "ui://guess-number/guess-number-app.html"));
        }
    }

    ...
}
The @McpTool annotation is the entry point to start the MCP App.
It differs slightly from the previous article, mainly through metaProvider.
The description tells the LLM when to call this tool.
For example, if the user says I want to play guess the number, the LLM will call this tool.
It also provides the resource URI, so that the MCP client can load that resource.
The third step is optional. If the MCP App UI needs to execute some calls to the MCP server (to query some data or to perform some actions), these calls are implemented as MCP tools. In our case, the MCP App UI calls the server to check a user guess. The corresponding tool is:
@Service
public class GuessNumberMcpApp {

    ...

    // Step 3 - The tool that checks the user's guess

    @McpTool(title = "Check a Guess", name = "check-guess",
            description = """
                    Check if a guess for the secret number is correct.
                    Returns TOO_LOW, TOO_HIGH, WON (a new secret number is then chosen) or INVALID (number out of range).
                    """)
    public GuessResult checkGuess(@McpToolParam(description = "The user guess") int number) {
        ...
    }

    ...
}
For clarity, I removed the implementation details of the checkGuess method. But this is just a regular MCP tool,
there is nothing specific to MCP Apps.
Finally, write the HTML/JavaScript content of the resource.
The file is src/main/resources/app/guess-number-app.html.
This MCP App UI looks like a regular HTML page, but uses a bit of the
MCP App JavaScript API.
Let's focus on the important parts of the HTML content, under the <script type="module"> tag
of guess-number-app.html:
import {App} from "https://unpkg.com/@modelcontextprotocol/ext-apps@2.0.3/app-with-deps";

const app = new App({name: "guess-the-number", version: "1.0.0"});

await app.connect();
The import brings the JavaScript library that implements the MCP App API.
The hostname, unpkg.com, is allowed by the CSP of the MCP resource.
The App class is used to connect to the MCP host.
The number to guess could be stored in the HTML page, but to demonstrate tool calls from the UI, I chose to store it on the MCP server side. I also chose to store a single global number to guess for all users. It is simpler to implement and good enough for this article.
The guess is checked by calling the check-guess MCP tool. This is implemented in the JavaScript code
that handles the form submission:
form.addEventListener("submit", async (event) => {
    ...

    // Extract the user guess from the form
    const number = Number(input.value);

    ...

    // Call the MCP tool to check the user guess
    const result = await app.callServerTool({name: "check-guess", arguments: {number}});

    // Extract the tool response
    const text = result.content?.[0]?.text ?? "";

    // Update the UI ("Too high", "Too low" or "You won")
    ...

    if (hasWon) {
        // Update the LLM conversation with the result of the game
        try {
            await app.updateModelContext({
                content: [{type: "text", text: `The user guessed number ${number} in ${attempts} attempts.`}]
            });
        } catch (e) {
            // This is not supported by all MCP clients
            console.log("Failed to update the model context", e);
        }
    }
});
The app.callServerTool method is used to call the check-guess MCP tool implemented in the backend.
It returns a response such as TOO_LOW, TOO_HIGH, WON or INVALID that is used to update the UI.
If you want to update the LLM conversation with some information, you can use the app.updateModelContext method,
but this is not supported by all MCP clients.
Run it in MCP Inspector
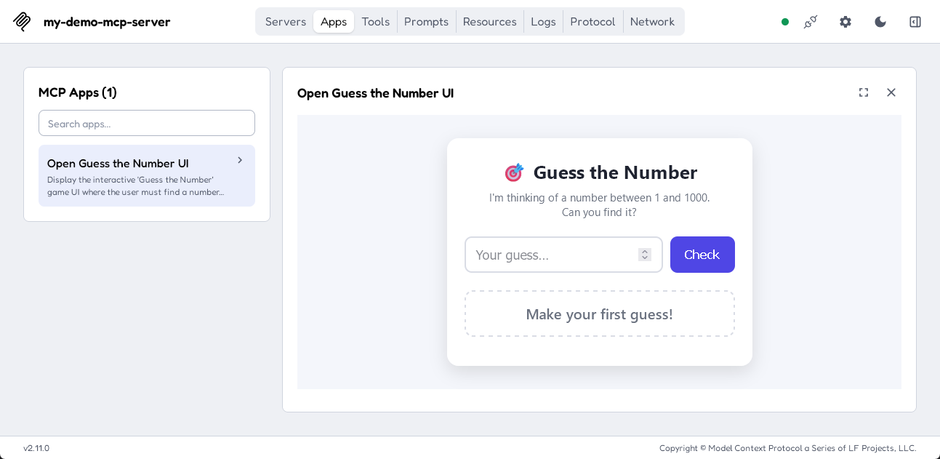
Let's play Guess the Number MCP App with the MCP Inspector web UI.
Unlike most MCP clients, MCP Inspector does not use an LLM. It's a convenient and deterministic tool that allows you to inspect MCP servers and test their tools, prompts, resources and apps. You cannot ask it to run a tool in natural language, you run tools and apps directly yourself.
MCP Inspector is a Node.js application, run npx @modelcontextprotocol/inspector to open its web interface.
CLI and TUI interfaces are also available.
Then add your MCP server. For MCP Inspector 2.11.0, use the top right Add Servers then Add manually button:
- Choose a name, such as
my-demo-server - Select the
streamable-httptransport type - Use the
http://localhost:8080/mcpURL - Click
Add - Click on the
Disconnectedradio button to connect to the server
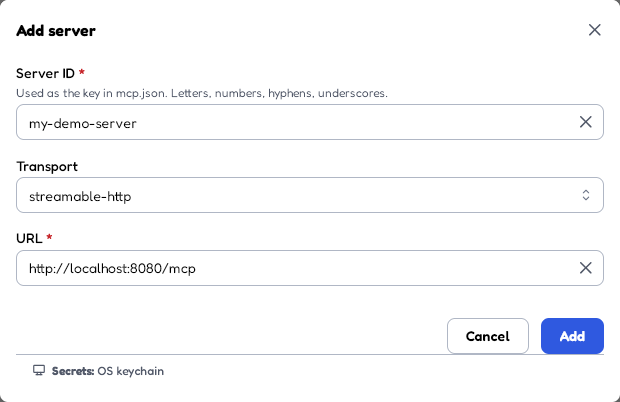
Now you can use the app:
- Click on the top
Appsbutton - Select the
Open Guess the Number UIapp on the left side - Play with the app
Run it in Goose
Goose is a general-purpose AI agent that supports MCP, including MCP Apps. It's available as a desktop application or a CLI. I will show the desktop application here.
Once Goose is installed and started, first configure your LLM provider and model,
under Settings (bottom left) then Models. Goose supports a wide range of local and online LLM providers.
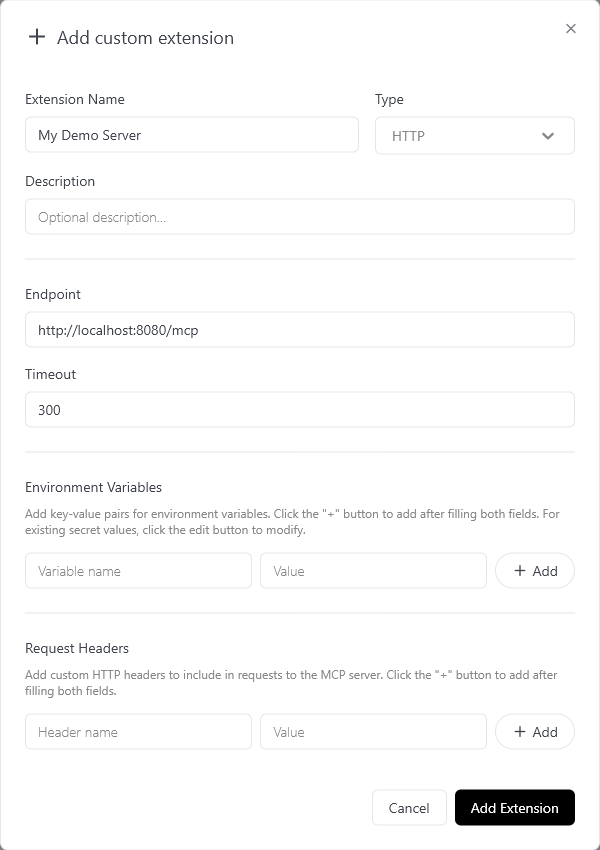
Then add your MCP server, under Extensions (left side) then Add custom extension:
- Choose a name, such as
My Demo Server. - Select the
Streamable HTTPtype - Use the
http://localhost:8080/mcpURL - Click
Add Extension
Then run the app:
- Click on
New Chat(left side) - Run the
I want to play guess the numberprompt - Play with the app
Conclusion
In this article, I described the benefits of MCP Apps over traditional text-based LLM applications, and how to use them in MCP Inspector and Goose MCP clients.
I showed how to implement the frontend and backend parts of a simple MCP App using Spring AI. The JavaScript API supports additional interesting features, such as retrieving the input parameters or return values of the MCP tool that launched the app. Feel free to experiment.